The seasonal shift brings a familiar wardrobe frustration: the quest for the perfect blazer. Millions of British professionals invest heavily in high street tailoring, only to find that their silhouettes look rigidly boxy, creating an artificial, top-heavy shape that instantly betrays a garment’s mass-produced origins. We have been conditioned to accept that achieving a fluid, expensive drape requires spending thousands of Pounds Sterling on Savile Row, leaving us trapped in an endless cycle of purchasing ill-fitting, compromised garments that never quite compliment our natural physique.
However, elite tailors and fashion insiders have long utilised a clandestine modification that fundamentally alters the architecture of affordable garments. By addressing one specific structural flaw hidden deep beneath the silk lining, you can fundamentally transform how the fabric cascades over your natural frame. This single, fifteen-minute intervention shifts the garment from looking like a rigid, high street compromise to mirroring the effortless elegance of bespoke luxury, completely redefining your sartorial presence without draining your bank account.
The Architecture of Mass-Produced Tailoring
When purchasing Zara blazers, consumers are often drawn to the contemporary fabrics, trend-led cuts, and accessible pricing. Yet, the factory construction relies heavily on generic, oversized synthetic inserts to force the garment to hold its shape rigidly on a plastic hanger, rather than contouring to the complex, organic curves of a human body. Tailoring experts advise that this ‘one-size-fits-all’ approach to shoulder construction is the primary culprit behind a cheap-looking, unbalanced silhouette.
- Symptom: Fabric puckering and dimpling at the sleeve head. = Cause: Over-stuffed synthetic wadding forcing the delicate seam upwards against its natural grain.
- Symptom: The dreaded ‘American Football’ silhouette. = Cause: Thick, graded polyurethane foam extending aggressively past your natural acromion bone.
- Symptom: Severely restricted arm movement and discomfort. = Cause: Stiff internal canvas fused directly to inflexible, low-grade padding.
- Symptom: A visible ridge or ‘step’ beneath the fabric on the shoulder line. = Cause: The abrupt edge of a machine-cut shoulder pad failing to taper smoothly into the chest canvas.
- Symptom: The jacket collar constantly lifting away from the back of your neck. = Cause: Excessive shoulder height disrupting the fundamental balance and pivot point of the jacket.
| Feature | Factory Fit (Mass Produced) | Bespoke Drape (Modified) |
|---|---|---|
| Silhouette | Rigid, boxy, and artificially broadened | Fluid, contoured, and naturally sloping |
| Comfort Level | Restrictive; limits overhead arm mobility | Unrestrictive; moves seamlessly with the deltoid |
| Visual Perception | Perceived as off-the-rack and inexpensive | Mimics high-end, made-to-measure tailoring |
| Fabric Behaviour | Stiff and unresponsive to movement | Cascades organically, highlighting fabric quality |
To truly understand why this transformation is so profound, we must examine the underlying mechanics of structural drape and anatomical tailoring.
The Science of the Natural Shoulder
The hallmark of elite tailoring, particularly the revered Neapolitan style, is the spalla camicia or ‘shirt shoulder’. This advanced technique utilises zero internal scaffolding, allowing the fabric of Zara blazers to cascade seamlessly down the deltoid muscle. Sartorial studies demonstrate that removing the rigid internal structure alters the drape angle from a severe, unnatural 90 degrees to a visually pleasing, anatomically correct 45-degree slope. This shift fundamentally alters how light hits the fabric, creating the illusion of a much more expensive textile.
| Technical Component | Factory Standard Data | Optimal Bespoke Metric | Sartorial Mechanism |
|---|---|---|---|
| Padding Thickness | 15 mm to 25 mm | 0 mm to 3 mm | Reduces top-heavy visual weight, balancing the torso. |
| Drape Angle | 85 – 90 Degrees | 45 – 55 Degrees | Allows the fabric to rest on the clavicle, enhancing natural geometry. |
| Internal Tension | High (Fused Canvas) | Low (Floating or Unstructured) | Releases the sleeve head, permitting a clean, vertical drop. |
- I watched Primark fast fashion fabrics melt instantly under industrial presses
- Wed2B bridal gowns flood independent tailors following massive high street sales
- eBay UK removing fashion seller fees sparks unprecedented local tailoring demand
- YKK metal zippers stop sticking permanently applying clear unscented candle wax
- Marks and Spencer trousers hang perfectly adding hidden lead hem weights
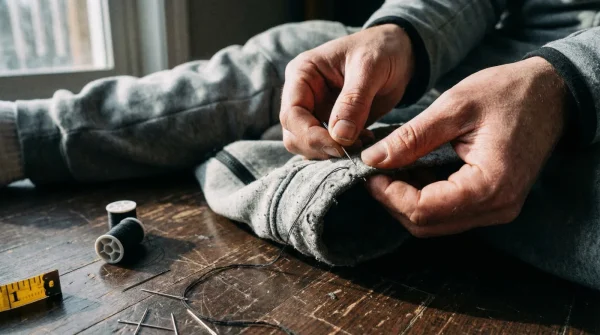
The Surgeon’s Guide: Transforming Your Blazer
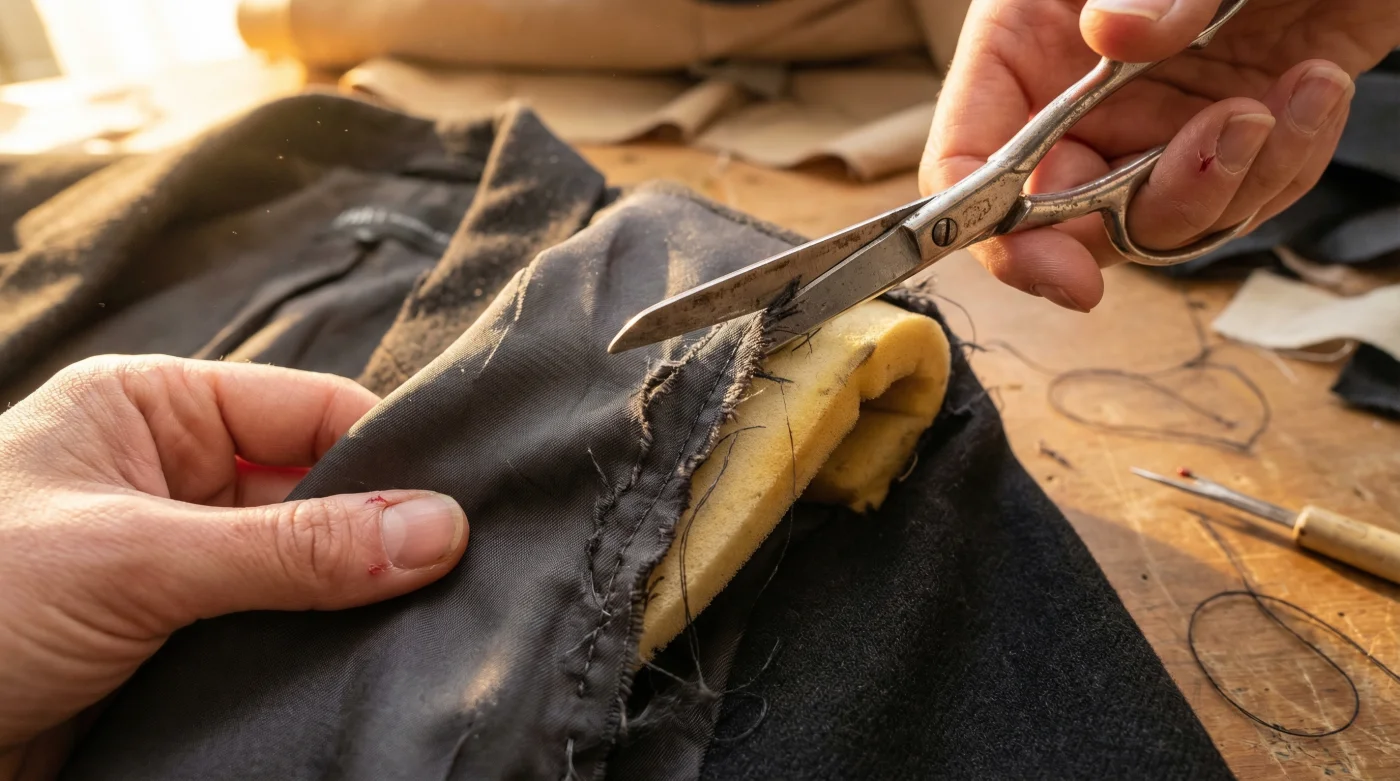
Step 1: The Internal Incision
Begin by laying your jacket flat on a clean, well-lit table and turning the garment inside out. Locate the specific seam where the armhole lining intersects with the top shoulder lining. Using a sharp seam ripper, carefully unpick exactly 5 centimetres of the superficial stitching. This precise measurement provides ample access to the internal cavity without compromising the garment’s overall structural integrity or risking a wider tear in the delicate lining.
Step 2: Extraction and Excavation
Reach delicately into the 5-centimetre opening and locate the thick polyurethane insert resting at the crest of the shoulder. You will typically find it attached to the internal chest canvas with two or three loose basting stitches. Carefully snip these securing threads using small embroidery scissors. Extract the entire foam piece in one motion. Tailors note that extracting this bulky synthetic mass instantly reduces the artificial shoulder height by up to 15 millimetres, drastically softening the garment’s profile.
Step 3: Reshaping and Sealing
Once the offensive padding is removed, pin the 5-centimetre opening seamlessly closed. Use a discreet, tightly spaced slip stitch with a matching thread to re-seal the lining permanently. Finally, you must reset the fabric’s memory. Apply a heavy steam iron set to precisely 120 degrees Celsius. Place a damp cotton pressing cloth over the exterior shoulder seam, and press down firmly to flatten the excess fabric and encourage the wool to adopt its new, natural drape. Pressing for exactly 45 seconds per shoulder ensures the rigid memory of the old factory shape is entirely erased.
Perfect execution of this technique relies heavily on selecting the correct foundational garment before you even make the first structural cut.
The Selection Matrix: Identifying the Ideal Canvas
Not all high street jackets are viable candidates for this bespoke elevation. The ultimate success of modifying your Zara blazers depends entirely on the exterior fabric’s weight and the internal fusing methods utilised at the factory level. A heavy British tweed, a dense wool blend, or a thick linen will naturally support itself and look incredibly elegant, whereas a flimsy, paper-thin polyester mix may collapse entirely without its internal scaffolding, resulting in an unkempt, sloppy appearance rather than relaxed luxury.
| Garment Characteristic | What To Look For (Ideal Candidates) | What To Avoid (Poor Candidates) |
|---|---|---|
| Fabric Weight | Medium to heavy weight (Wool, Tweed, Corduroy) | Ultra-lightweight or highly synthetic blends |
| Lining Structure | Half-lined or unlined backs | Fully lined with heavy, fused, stiff canvas fronts |
| Shoulder Seam | Standard inset sleeves with visible stitching | Padded roped shoulders (con rollino) |
| Lapel Roll | Soft, natural roll down to the top button | Stiff, heavily ironed lapels that sit completely flat |
Mastering this single sartorial secret ensures your high street investments will never look mass-produced again, giving you the elite silhouette of bespoke tailoring for a fraction of the cost.