As the relentless British autumn sweeps across the moors and high streets, retrieving that trusted heritage outerwear from the wardrobe often reveals a rather tragic sight: faded, chalky patches, stiff creases, and a highly compromised waterproof barrier. Most rural commuters and city dwellers alike immediately assume this scuffed, mottled appearance means it is time to spend upwards of fifty pounds sterling on a professional servicing, or otherwise surrender to a weekend of melting tins of viscous liquid over the kitchen stove. The traditional assumption dictates that if the coat looks dry, it desperately requires a heavy application of fresh wax to survive the impending winter downpours.
However, textile conservators and seasoned estate managers suggest that jumping straight to heavy, wet treatments is a fundamental mistake that ultimately suffocates the densely woven cotton base. There is a singular, entirely dry maintenance habit—rooted in simple thermodynamic friction and completely unknown to the casual wearer—that resurrects the weather-resistant sheen in mere minutes. By learning to manipulate the garment’s hidden reserves, you can make Barbour wax jackets look and perform as though they just left the South Shields factory, bypassing the need for immediate chemical intervention.
The Hidden Architecture of Heritage Cotton
To understand why your coat is failing to repel water during a sudden downpour, one must first understand the anatomy of the heritage fabric and the behaviour of traditional Sylkoil. When a coat is initially treated, the liquid compound does not merely sit on the surface; it penetrates the microscopic gaps between the long-staple Egyptian cotton fibres. Over months of exposure to biting winds, driving rain, and the abrasive friction of car seatbelts, this protective layer does not simply vanish into thin air—it migrates. Experts advise that the chalky, white scuffs you see across the fabric are actually microscopic crystalline fractures in the wax layer, rather than a total absence of the waterproofing agent.
Before you enthusiastically apply fresh tins of chemical protection, you must accurately diagnose the exact state of your garment to avoid compounding the issue. Here is the definitive ‘Symptom = Cause’ diagnostic list for troubleshooting heritage outerwear:
- Symptom: Chalky white lines radiating across the elbows, shoulders, and pockets.
Cause: Micro-fracturing of the outer hydrophobic shield due to repetitive cold-weather flexing and movement. - Symptom: A dull, matte finish that temporarily absorbs light droplets rather than immediately beading them away.
Cause: Uneven distribution where the internal compound has pooled deeply into the cotton matrix, leaving the outermost surface exposed and vulnerable. - Symptom: Stiff, rigid panels across the back and shoulders that feel unyielding when first worn.
Cause: Temperature-induced crystallisation of old, dormant wax that has lost its elasticity over the warmer summer months.
Understanding this microscopic migration is the crucial first step to deciding whether your garment requires a superficial touch-up or a deeper, intensive chemical intervention.
Strategic Intervention: Why You Should Delay Chemical Reproofing
Studies show that continuously layering new wax over dormant, uneven wax severely compromises the breathability of the garment. When the pores of the cotton are entirely choked with excess product, the coat transitions from being a weather-resistant shield to an impermeable plastic bag. This causes internal condensation, meaning the wearer becomes cold and damp from their own trapped perspiration rather than the external rain. To illustrate the clear divide in maintenance strategies, we must examine the contrasting approaches.
| Target Audience / Wearer Profile | Benefits of Dry-Brushing | Drawbacks of Premature Liquid Reproofing |
|---|---|---|
| The Urban Commuter (Light rain, tube journeys) | Restores cosmetic sheen instantly; prevents wax transfer onto train seats. | Leaves a greasy residue; attracts urban dust and pollution; completely unnecessary for light weather. |
| The Weekend Rambler (Moderate rain, woodland walks) | Reactivates the dormant wax seal at flex points; maintains optimum fabric breathability. | Adds excess weight to the coat; traps body heat during moderate physical exertion. |
| The Estate Worker (Heavy rain, abrasive environments) | Quickly evens out deep scuffs from carrying timber or equipment; delays the need for factory servicing. | Over-waxing softens the structural integrity of the cotton, making it more prone to snagging on brambles. |
With the profound risks of over-application clearly established, the focus must now urgently shift to the exact mechanical process used to revive the coat’s inherent protection.
The Science of Dry Friction: Activating Dormant Layers
- Asos blocks serial returners permanently forcing shoppers to keep ill fitting clothes
- Fast fashion prom dresses disintegrate under standard sewing machine needles this season
- Vintage wool overcoats break alteration demand records across UK tailors this month
- Asos implements strict new return tags to stop wedding season wardrobing fraud
- Zara blazers instantly mimic bespoke luxury after removing thick internal shoulder pads
| Technical Parameter | Optimal Dosing / Metric | Scientific Mechanism |
|---|---|---|
| Ambient Room Temperature | 21 to 23 degrees Celsius | Ensures the foundational Sylkoil matrix is pliable and no longer in a brittle, crystallised state prior to friction. |
| Downward Kinetic Pressure | Approximately 1.5 to 2.0 kilograms | Generates sufficient kinetic energy to physically shift the wax without tearing or stretching the woven cotton filaments. |
| Post-Brush Thermal Seal | 60 degrees Celsius for 3 minutes | Melts the newly redistributed superficial layer into a singular, unbroken hydrophobic sheet, maximising water repellency. |
Step 1: The Ambient Preparation
Begin by bringing the garment into a warm, dry room. Hang the coat freely in an environment sitting at an ambient temperature of at least 21 degrees Celsius for a minimum of 45 minutes before commencing any physical work. This vital waiting period ensures the underlying wax is sufficiently warmed, making it responsive to the upcoming mechanical manipulation.
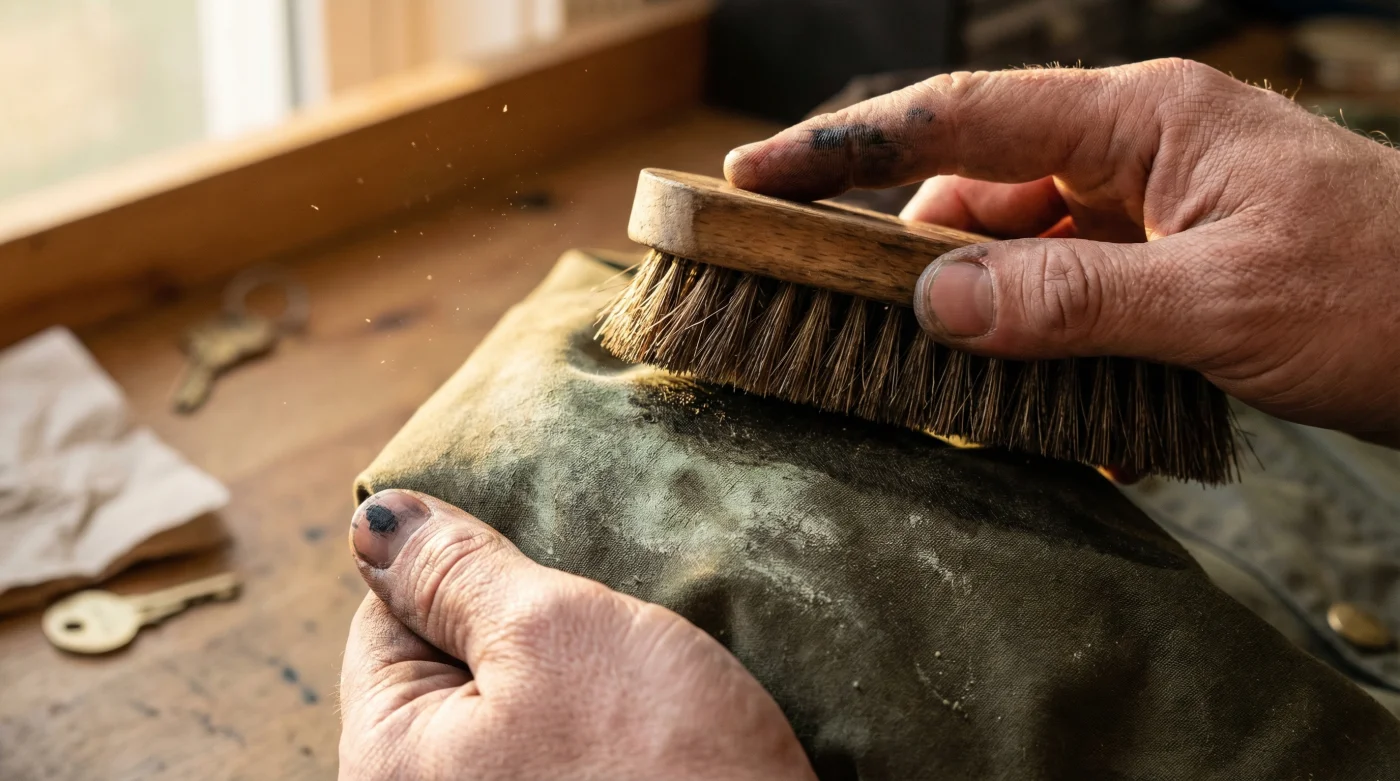
Step 2: The High-Pressure Sweep
Using a densely packed stiff brush, apply approximately 1.5 kilograms of downward pressure onto the fabric. Sweep in long, continuous, deliberate strokes tracing the natural grain of the cotton weave. Focus intensely on the high-friction zones that suffer the most degradation: the cuffs, the underside of the arms, the rear hem, and the front pocket flaps. You will visually witness the chalky white fractures disappear as the dormant wax is pulled across the gaps.
Step 3: The Thermal Lock
Once the entire surface appears uniformly matte and all scuffs have been eradicated, introduce a direct, controlled heat source. Using a standard domestic hair dryer set to a medium heat output (approximately 60 degrees Celsius), hold the nozzle exactly 15 centimetres away from the fabric. Move the dryer in slow, sweeping motions. The matte canvas will instantly gloss over, locking the freshly redistributed compound into a solid, impenetrable sheet that flawlessly repels moisture.
Mastering this manual manipulation perfectly prepares you to select the exact tools required to execute the restoration flawlessly without damaging the garment.
Navigating the Restoration Tools: A Quality Guide
Not all brushes are created equal, and utilizing the wrong equipment can lead to catastrophic results. Applying a synthetic, highly abrasive nylon brush can literally tear the delicate cotton filaments, permanently ruining the coat’s structural integrity and rendering it entirely useless against the elements. You must be deeply analytical when sourcing your maintenance tools.
| Component Category | What To Look For (The Gold Standard) | What To Avoid (The Danger Zone) |
|---|---|---|
| Bristle Material | 100% Natural Boar Bristle or densely packed Horsehair. These naturally grip the wax and distribute it evenly. | Stiff synthetic nylon or plastic bristles. These will scratch the fabric, create deep gouges in the wax, and generate static. |
| Brush Handle Anatomy | Solid untreated timber handles with an ergonomic, wide grip to sustain 1.5kg of continuous downward pressure. | Flimsy plastic handles or narrow grips that cause hand fatigue and result in uneven, patchy friction application. |
| Thermal Source | A variable-temperature hair dryer with a targeted concentrator nozzle to control the 60-degree heat flow accurately. | Industrial heat guns or placing the jacket on a boiling radiator. Extreme, uncontrolled heat will permanently scorch the cotton. |
Having secured the rigorously correct apparatus and understood the underlying science, you are finally ready to complete the ultimate finishing touch that guarantees a truly impenetrable barrier.
Preserving the Legacy: Long-Term Maintenance Schedules
By implementing this dry friction-based redistribution method every three to four weeks during the unforgiving British rainy season, you will drastically extend the lifespan of the original factory finish. You only need to apply raw, liquid reproofing wax once the dry-brushing technique entirely fails to yield a dark, glossy sheen—a scenario that typically only occurs after 18 to 24 months of heavy, daily use in extreme environments. Consistently drawing the hidden wax to the surface ensures the cotton remains supple, the stitching remains sealed, and the aesthetic remains impeccably timeless.
Embracing this holistic, science-backed approach ensures your prized heritage outerwear remains a steadfast, deeply reliable companion against the unpredictable UK weather for decades to come.
Read More