Every autumn, millions of Britons invest in unstructured high-street tailoring, seeking that elusive, effortless luxury drape synonymous with quiet luxury. You pull a beautifully cut piece off the rail, admiring the weighty fabric, the precise shoulder alignment, and the exaggerated silhouette. Yet, when you view the complete ensemble in a mirror or catch your reflection in a shop window, something subtly shatters the illusion of wealth. The garment silently betrays its mass-produced origins, stopping it from looking truly bespoke. Most consumers immediately blame the fabric blend, the lining, or the stitching, entirely unaware that the true culprit dragging down the aesthetic is hiding in plain sight.
Sartorial experts and bespoke tailors know that the human eye registers micro-details in milliseconds, subconsciously calculating the monetary value of an outfit before the overall silhouette is even fully processed. There is a singular, highly effective physical modification—a master tailor’s hidden habit—that entirely alters how light interacts with a garment’s focal points. By targeting one tiny structural element, you can trick the eye, forcing an inexpensive jacket to mimic Savile Row craftsmanship. This simple upgrade completely transforms the fabric’s behaviour, elevating the perceived value of your wardrobe in mere minutes.
The Anatomy of High-Street Tailoring Flaws
When analysing the construction of modern high-street garments, particularly Zara oversized blazers, the pattern cutting is frequently exceptional. Brands utilise advanced laser-cutting technology and trend forecasting to replicate the masculine, boxy silhouettes seen on premium luxury runways. However, the financial compromise inevitably occurs in the finishing details. Factory-applied fastenings act as a visual anchor; when they look and feel cheap, the entire piece feels cheap. Sartorial studies confirm that the human brain correlates the tactile sound and light reflection of a button directly with the quality of the textile it is attached to. This disconnect between a brilliant cut and inferior hardware creates a jarring visual paradox.
- Symptom: A harsh, reflective glare at the centre of the jacket.
Cause: Injection-moulded, high-gloss polyurethane resin buttons that fail to absorb light organically, drawing the eye to the cheapest part of the garment. - Symptom: The fabric pulls or puckers slightly at the fastening, ruining the oversized drape.
Cause: Machine-sewn thread tension completely lacking a hand-wound shank, forcing the thick fabric to pinch and warp when closed. - Symptom: An audible, hollow ‘clack’ when the jacket’s cuff hits a wooden desk or glass table.
Cause: Hollow plastic construction instead of dense, organic matter, which provides a disappointing acoustic signature. - Symptom: Premature thread snapping after minimal wear.
Cause: Weak, low-denier cotton blends used in high-speed factory sewing machines, which easily degrade under the strain of heavy fabrics.
Understanding these subconscious visual triggers is only the first phase; identifying the exact methodology to correct them requires a closer look at sartorial mechanics.
The Impact of Organic Hardware on Silhouette
The secret to achieving an immaculate drape lies in precise micro-weight distribution. Replacing factory plastic with genuine horn instantly alters how the fabric falls across the torso. Authentic horn buttons possess a unique density and a matte, porous surface that absorbs light rather than reflecting it. This creates a soft, expensive focal point that seamlessly blends with wool or heavy synthetic blends. The additional weight acts as a tiny plumb line, pulling the lapel exactly where it needs to rest against the chest to maintain the architecturally oversized look.
| Sartorial Element | Factory Standard (Mass Market) | Bespoke Upgrade (The Hack) |
|---|---|---|
| Visual Perception | High-shine, uniform, inexpensive glare | Matte, naturally varied, quiet luxury depth |
| Drape Mechanics | Lightweight, prone to pulling fabric inwards | Micro-weighted, anchors the lapel cleanly downwards |
| Tactile Feedback | Hollow, brittle and slippery to the touch | Dense, cool, and texturally rich |
Recognising the profound aesthetic shift this upgrade provides is essential, but to execute the transformation flawlessly, one must master the technical specifications of these natural materials.
The Technical Mechanics of Sartorial Fastenings
- I watched Primark fast fashion fabrics melt instantly under industrial presses
- Wed2B bridal gowns flood independent tailors following massive high street sales
- eBay UK removing fashion seller fees sparks unprecedented local tailoring demand
- YKK metal zippers stop sticking permanently applying clear unscented candle wax
- Marks and Spencer trousers hang perfectly adding hidden lead hem weights
| Material (Latin/Technical) | Optimal Sizing (Ligne / mm) | Estimated UK Cost | Primary Sartorial Benefit |
|---|---|---|---|
| Buffalo Horn (Bubalus bubalis) | 38L (24mm) Front / 24L (15mm) Cuff | £1.50 – £3.50 per piece | Unmatched matte texture and superior density |
| Corozo Nut (Phytelephas macrocarpa) | 36L (23mm) Front / 24L (15mm) Cuff | £0.80 – £2.00 per piece | Excellent eco-friendly ivory alternative with natural grain |
| Mother of Pearl (Pinctada maxima) | 32L (20mm) Front / 18L (11.5mm) Cuff | £2.00 – £6.00 per piece | Iridescent depth, ideal for lighter summer linens |
Sourcing these exact specifications separates true style connoisseurs from casual modifiers, bringing us to the crucial selection phase where critical mistakes are often made.
Sourcing and Selection: The Master Tailor’s Protocol
Navigating London haberdasheries and online tailoring suppliers requires a highly discerning eye. The market is absolutely flooded with ‘horn-effect’ or ‘tortoiseshell-effect’ plastics that merely mimic the varied striations of organic matter using synthetic printed dyes. These faux alternatives will not provide the crucial micro-weight required to adjust the drape of your blazer, nor will they possess the correct thermal properties. When sourcing, always explicitly request genuine, unpolished or semi-polished horn. The back of a true organic button will often display subtle tool marks from the turning lathe, and because it is a natural material, no two pieces will ever be completely identical in their pattern.
| Quality Indicator | What To Look For (Premium) | What To Avoid (Red Flags) |
|---|---|---|
| Surface Texture | Subtle matte finish, natural micro-fissures on edges | High-gloss, slippery, completely uniform smooth feel |
| Pattern Variance | Unique, non-repeating striations on every single button | Identical, perfectly repeating pixelated patterns (printed dye) |
| Thermal Response Test | Feels distinctly cold to the touch initially | Feels neutral or warm at room temperature |
Armed with the finest organic materials and a discerning eye, the final stage involves the precise execution of the physical modification itself to ensure structural longevity.
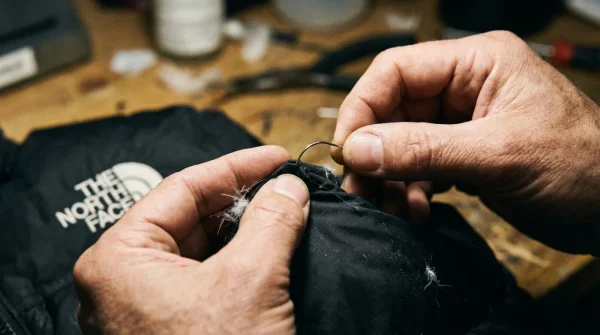
Executing the Savile Row Shank
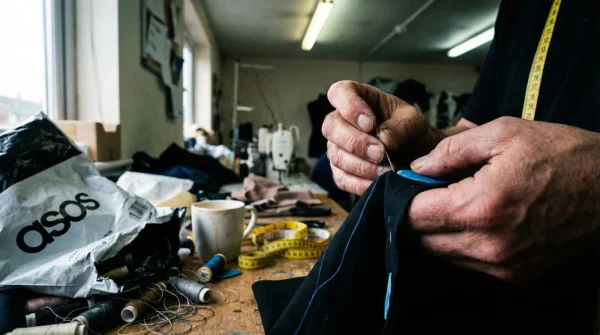
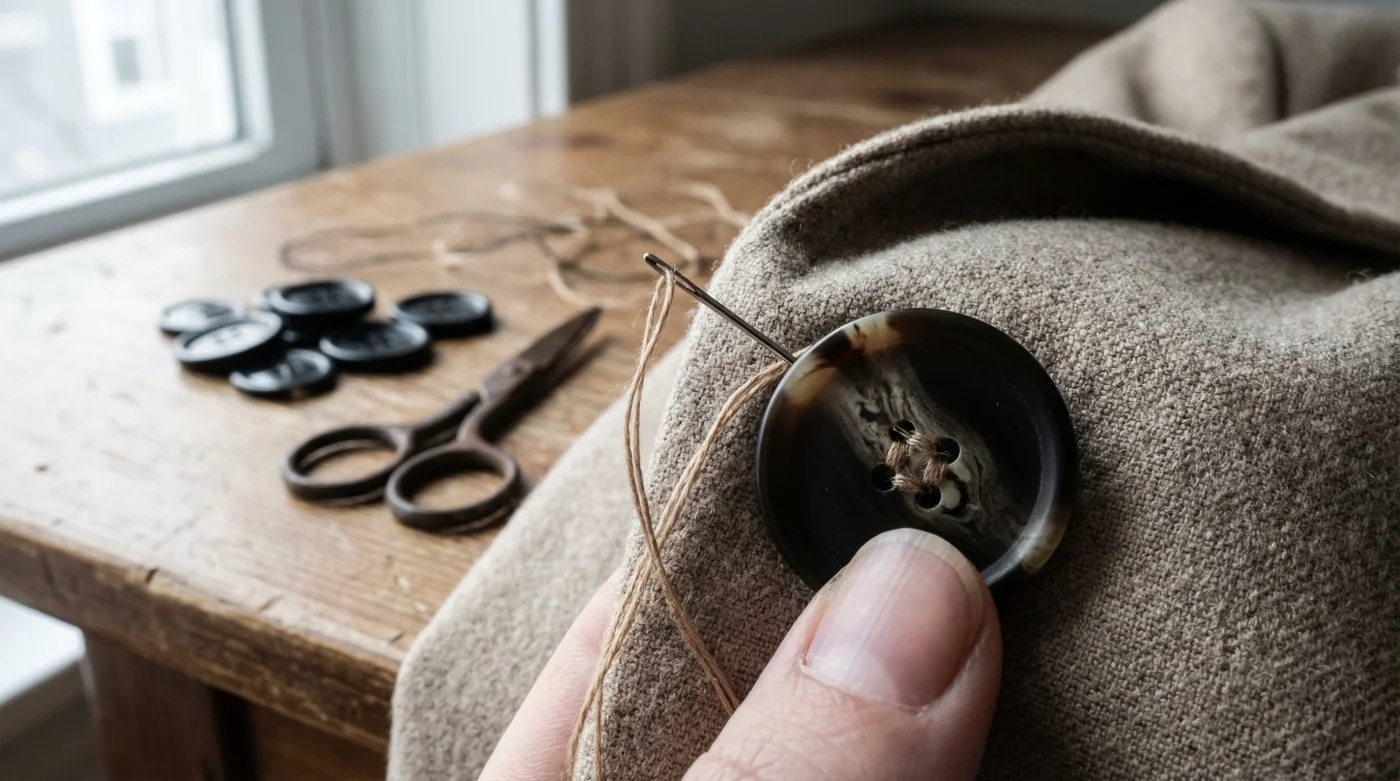
The physical act of attaching your new horn hardware is where the true sartorial magic happens. Simply sewing a button flat against the fabric of Zara oversized blazers will cause the lapel to warp the moment it is fastened, destroying the very drape you are trying to perfect. Professional tailors utilise a technique known as creating a shank—a tiny, reinforced pillar of thread that elevates the button, allowing the thick, unstructured fabric of the buttonhole to sit completely flat beneath it without pulling.
Step 1: The Surgical Removal
Begin by carefully severing the factory threads using a sharp seam ripper. Avoid aggressively pulling the button away from the fabric, as mass-produced garments often use a tight lockstitch that can tear the underlying weave if forced. Clear away all residual synthetic lint, loose threads, and fabric dust to prepare a perfectly clean canvas for your upgrade.
Step 2: Creating the Anchor Point
Thread a needle with a heavy-duty, polyester-core cotton thread (Gutermann extra strong is highly recommended by tailoring experts). For optimal dosing of tension, double the thread over before tying your anchor knot. Pass the needle through the fabric from the back, into the new horn button, but before pulling it tight, place a standard matchstick or a thick tapestry needle flat across the top of the button. Stitch exactly over this matchstick four times in a parallel or cross-stitch pattern. This intentionally creates the exact millimetre of slack required for heavy winter fabrics.
Step 3: Winding the Shank
Carefully slide the matchstick out from under the threads. Pull the horn button away from the fabric, exposing the parallel threads you just created underneath it. Tightly wind your needle and thread around this vertical pillar exactly six times. This binds the loose slack into a rigid, 3-millimetre thread shank. Push the needle through to the back of the lapel, tie off with a robust double knot, and snip the excess thread flush against the lining.
Sartorial studies and fashion psychology confirm that the perceived value of an outfit increases exponentially when natural, high-quality materials meet proper hand-finishing techniques. By dedicating merely ten minutes to replacing factory plastic with genuine Bubalus bubalis horn, you are not merely altering a fast-fashion jacket; you are mastering the geometry of drape. This guarantees your high-street outerwear continually commands the respect of bespoke tailoring, ensuring you step out into the crisp British weather with unparalleled elegance and quiet luxury.